Linux Programmer | RHCE | RHCSA

Search This Blog

Saturday 30 May 2020

Load balacing containers(Docker)

This is my first blog related to Docker.

With docker there are two main ways to communicate docker with each other. 
  • With using the links which configure the container with the environment variables and host entry that allow containers to communicate with each other.
  • Second is service discovery patterns that is Docker API.
The Service Discovery pattern is where the application uses a third party system to identify the location of the target service. 
for example, if our application wanted to talk to a database, it would first ask an API what the IP address of the database is. 
This pattern allows you to quickly reconfigure and scale your architectures with improved fault tolerance than fixed locations.
The machine name Docker is running on is called docker. If you want to access any of the services, then use docker instead of localhost or 0.0.0.0.
Step 1 - Nginx Proxy
  • We want to have NGINX service running which can dynamically discover and update its load balance configuration when new containers are loaded.
  • Thankfully has already been created and called nginx-proxy.
  • Nginx-proxy accepts HTTP requests and proxy the requests to the appropriate container based on the hostname.
Three key properties Required to be configure when launching the proxy container.
  1. The first is binding the container to HTTP port 80 on the host with using -p 80:80. This will ensure all HTTP requests are handled by the proxy.
  2. The second is to mount docker.sock file. This is the connection of docker daemon running on the host, that allows containers to using its metadata via API. Naginx proxy uses this to listen for events and then updates Nginx configuration based on the container IP.  Mounting file works same as mounting directories /var/run/docker.sock:/tmp/docker.sock:ro, Setting up :ro will restrict the access with readonly.
  3. Finally we can set optional _-e DEFAULTHOST=<domain>. If Request come in and doesnt make any specified hosts then this is the container where the request will be handled. This enables you to run multiple websites with different domains on single machine with fallback to a known website.
 
Task:
Launch Nginx proxy with below command,
 
docker run -d -p 80:80 -e DEFAULT_HOST=proxy.example -v /var/run/docker.sock:/tmp/docker.sock:ro --name nginx jwilder/nginx-proxy

Because we are using DEFAULT_HOST any request comes in that will be directed to the 
container which contains the host proxy.example.


You can make a request to the web server using curl http://docker. As we have no containers,
it will return a 503 error.

Step 2 : Single Host
 
Nginx now listening to the events which docker raises on start/stop.

Starting container.
For Nginx-proxy to start sending requests to a container you need to specify the  
VIRTUAL_HOST environment variable. This variable defines the domain where requests will 
come from and should be handled by the container.
 
In this scenario we'll set our HOST to match our DEFAULT_HOST so it will accept all requests.
 
docker run -d -p 80 -e VIRTUAL_HOST=proxy.example test/docker-http-server
  
Here we are running container katacoda/docker-http-server that will running one website 
for testing.

Step 3: Cluster
  1. We now have successfully created a container to handle our HTTP requests.
  2. If we launch a second container with the same VIRTUAL_HOST then nginx-proxy will configure the system in a round-robin load balanced scenario. This means that the first request will go to one container, the second request to a second container and then repeat in a circle. There is no limit to the number of nodes you can have running.
Task:
Launch a second container using the same command as we did before.

docker run -d -p 80 -e VIRTUAL_HOST=proxy.example test/docker-http-server
Testing:

If we execute a request to our proxy using curl http://docker then the request will be handled by our first container. A second HTTP request will return a different machine name meaning it was dealt with by our second container.

Generated NGINX Configuration
While nginx-proxy automatically creates and configures NGINX for us, if you're interested in what the final configuration looks like then you can output the complete config file with docker exec as shown below.
 
docker exec nginx cat /etc/nginx/conf.d/default.conf
 
Additional information about when it reloads configuration can be found in the logs using,
docker logs nginx

Monday 20 January 2020

Configure Jfrog Artifactory with Jenkins

1. Download and configure JFrog Artifactory
Following are the steps to download and create repositories and configure permissions to certain users in JFrog Arifactory:
a. Download the JFrog artifactory .zip folder from https://bintray.com/jfrog/artifactory/jfrog-artifactory-oss-zip/4.15.0
b. Extract the .zip folder in your system. Go to the Bin folder and execute artifactory.bat
c. Go to the browser and visit localhost:8081 in order to visit to the artifactory in browser.


d. Log in as admin by providing the default credentials:
Username: admin
Password: password
e. You can create a Local repository to store package files created by the Jenkins/Maven project:
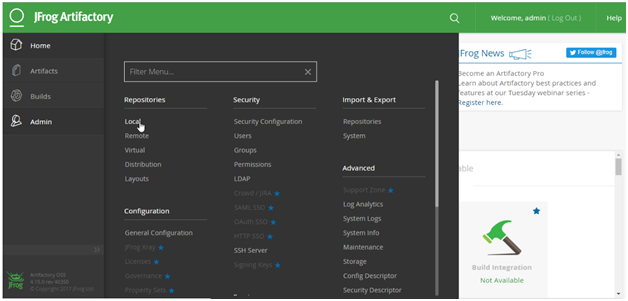
Go to Admin -> Repositories ->Local -> New


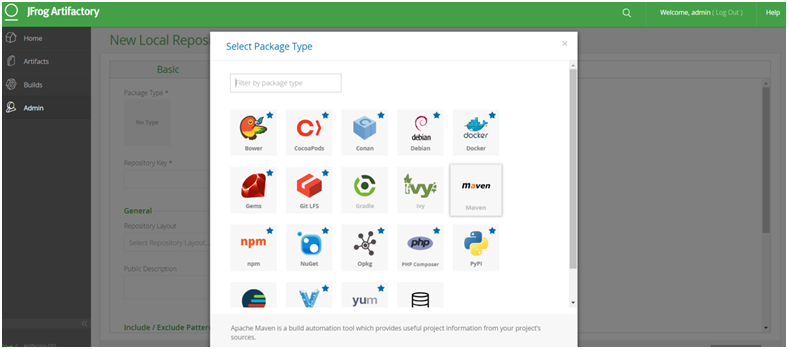
f. Select Maven


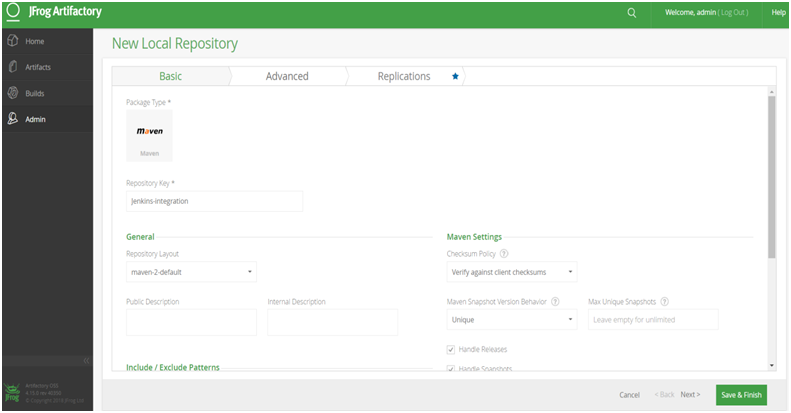
g. Provide key (name: Jenkins-integration) for your repository and check Handle Release and deselect Handle Snapshot.


h. Similarly create another local repository with key (e.g. Jenkins-snapshot) and check Handle Snapshot while deselecting Handle Release.
i.Create a user that you can utilize from Jenkins to access Artifactory:
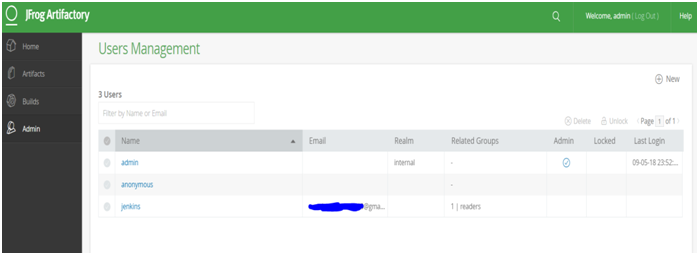
Go to admin -> Security -> users -> Click on NEW from Users management window -> Add new user->Save


Verify the list of users.
j. Provide the newly created user with permissions to the repositories:
Go to admin -> security-> users
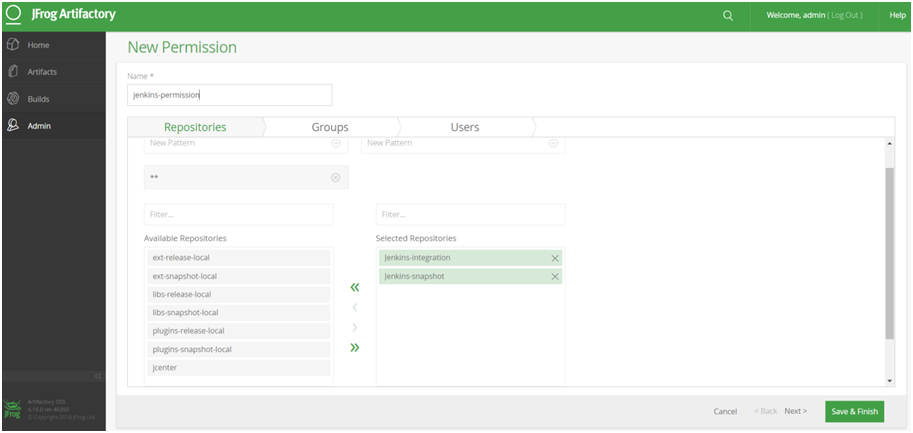
- Give the name to the permission
- Choose the repositories on which you want to set the permission
-Click save & finish


  • Check the Permissions Management section in Artifactory for recent changes:


k. Edit the permission and assign the user:


Check the Permissions Management section in Artifactory for recent changes:


Now you are ready to integrate Artifactory with Jenkins.
2. Artifactory Plugin configuration in Jenkins
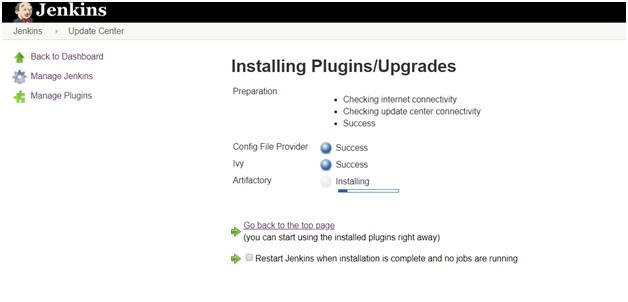
a. Go to Jenkins dashboard -> Manage Jenkins -> Manage Plugins -> Available -> Artifactory -> Install with restart.


b. Configure Artifactory-related settings in Jenkins:
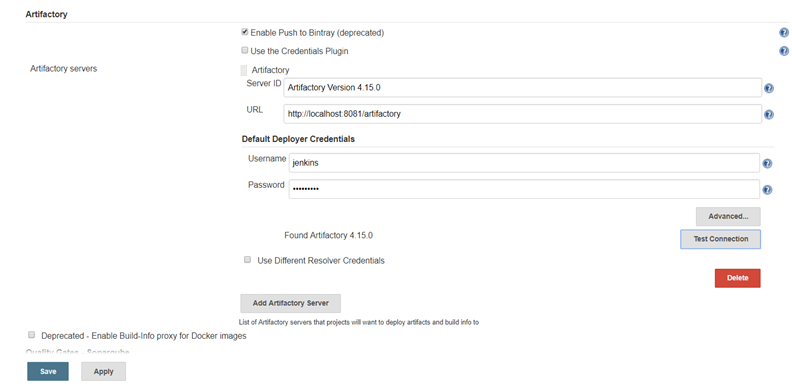
Go to Jenkins dashboard -> Configure System ->Artifactory section ->Add artifactory server -> provide the details -> Test the connection ->apply & save


c. Go to a Jenkins project that creates a package file after compiling all of the source files.
Go to Build Environment section -> Resolve artifacts from artifactory -> Click on refresh Repositories ->select the repository in release and snapshot field from the lists.


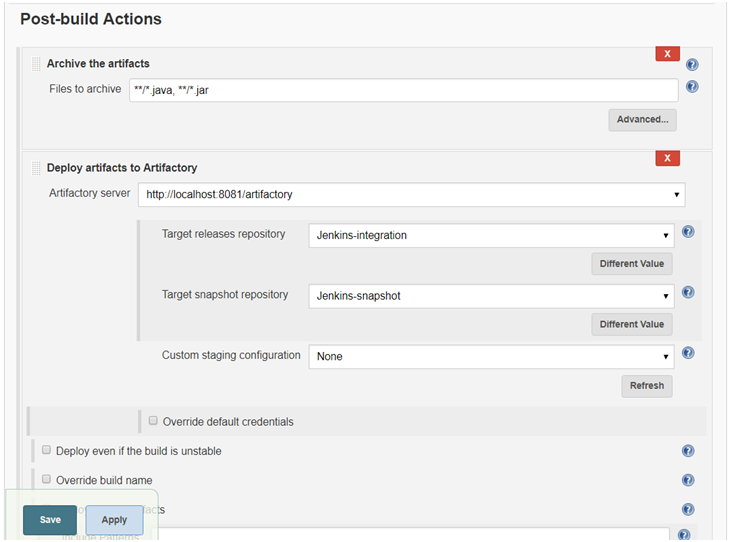
d. Go to Add post-build section ->select deploy artifacts to artifactory -> click on refresh -> choose the target releases and snapshot repository (repositories created earlier) ->save


e. Click on Build now and verify logs in the Console Output. Jar files are resolved from the local repository or Artifactory.
f. Once the package is created, it is stored in artifactory too. Go in the artifactory and check the package.

And Done !!!

Thursday 16 January 2020

S3cmd command line tools

Installation in ubuntu:
apt-get install s3cmd

Configure S3 Account:
s3cmd --configure


Usage:

 bucket list of S3
      s3cmd ls

  upload files on s3 bucket
      s3cmd sync -rv /LOCAL/DIR  s3://BUCKET/

  Download buck files with same pattern
      s3cmd get s3://BUCKET/2020-01-* /LOCAL/DIR/

  Make bucket
      s3cmd mb s3://BUCKET


  Remove bucket
      s3cmd rb s3://BUCKET


  List objects or buckets
      s3cmd ls [s3://BUCKET[/PREFIX]]


  List all object in all buckets
      s3cmd la 


  Put file into bucket
      s3cmd put FILE [FILE...] s3://BUCKET[/PREFIX]


  Delete file from bucket
      s3cmd del s3://BUCKET/OBJECT


  Delete file from bucket (alias for del)
      s3cmd rm s3://BUCKET/OBJECT


  Restore file from Glacier storage
      s3cmd restore s3://BUCKET/OBJECT


  Synchronize a directory tree to S3 (checks files freshness using 
       size and md5 checksum, unless overridden by options, see below)
      s3cmd sync LOCAL_DIR s3://BUCKET[/PREFIX] or s3://BUCKET[/PREFIX] LOCAL_DIR


  Disk usage by buckets
     s3cmd du [s3://BUCKET[/PREFIX]]


  Get various information about Buckets or Files
      s3cmd info s3://BUCKET[/OBJECT]


  Copy object
      s3cmd cp s3://BUCKET1/OBJECT1 s3://BUCKET2[/OBJECT2]


  Modify object metadata
      s3cmd modify s3://BUCKET1/OBJECT


  Move object
      s3cmd mv s3://BUCKET1/OBJECT1 s3://BUCKET2[/OBJECT2]


  Modify Access control list for Bucket or Files
      s3cmd setacl s3://BUCKET[/OBJECT]


  Modify Bucket Policy
      s3cmd setpolicy FILE s3://BUCKET


  Delete Bucket Policy
      s3cmd delpolicy s3://BUCKET


  Modify Bucket CORS
      s3cmd setcors FILE s3://BUCKET


  Delete Bucket CORS
      s3cmd delcors s3://BUCKET


  Modify Bucket Requester Pays policy
      s3cmd payer s3://BUCKET


  Show multipart uploads
      s3cmd multipart s3://BUCKET [Id]


  Abort a multipart upload
      s3cmd abortmp s3://BUCKET/OBJECT Id


  List parts of a multipart upload
      s3cmd listmp s3://BUCKET/OBJECT Id


  Enable/disable bucket access logging
      s3cmd accesslog s3://BUCKET


  Sign arbitrary string using the secret key
      s3cmd sign STRING-TO-SIGN


  Sign an S3 URL to provide limited public access with expiry
      s3cmd signurl s3://BUCKET/OBJECT <expiry_epoch|+expiry_offset>


  Fix invalid file names in a bucket
      s3cmd fixbucket s3://BUCKET[/PREFIX]


  Create Website from bucket
      s3cmd ws-create s3://BUCKET


  Delete Website
      s3cmd ws-delete s3://BUCKET


  Info about Website
      s3cmd ws-info s3://BUCKET


  Set or delete expiration rule for the bucket
      s3cmd expire s3://BUCKET


  Upload a lifecycle policy for the bucket
      s3cmd setlifecycle FILE s3://BUCKET


  Get a lifecycle policy for the bucket
      s3cmd getlifecycle s3://BUCKET


  Remove a lifecycle policy for the bucket
      s3cmd dellifecycle s3://BUCKET


  List CloudFront distribution points
      s3cmd cflist 


  Display CloudFront distribution point parameters
      s3cmd cfinfo [cf://DIST_ID]


  Create CloudFront distribution point
      s3cmd cfcreate s3://BUCKET


  Delete CloudFront distribution point
      s3cmd cfdelete cf://DIST_ID


  Change CloudFront distribution point parameters
      s3cmd cfmodify cf://DIST_ID


  Display CloudFront invalidation request(s) status
      s3cmd cfinvalinfo cf://DIST_ID[/INVAL_ID]

SSH not working with password after upgrade ubuntu 22.04

Issue: In recent upgrade of ubuntu 22.04 we are not able to login server with SSH password. but when we try to login with key then it allow...